Deploying a Nested VMware Cloud Foundation Lab with Holodeck Toolkit
Introduction
When setting up a VMware Cloud Foundation (VCF) environment for testing or training, deploying a full-scale production setup can be resource-intensive and time-consuming. To simplify this process, VMware provides the Holodeck Toolkit – a powerful automation tool designed specifically for creating nested VCF environments. Holodeck streamlines the deployment process, enabling engineers and learners to quickly build a functional VCF lab within a nested virtualization setup.
It’s important to note that Holodeck is intended solely for non-production use cases, such as testing, proof-of-concept, and training scenarios. This makes it an ideal solution for anyone looking to explore VCF features, validate configurations, or gain hands-on experience without the overhead of a full production deployment.
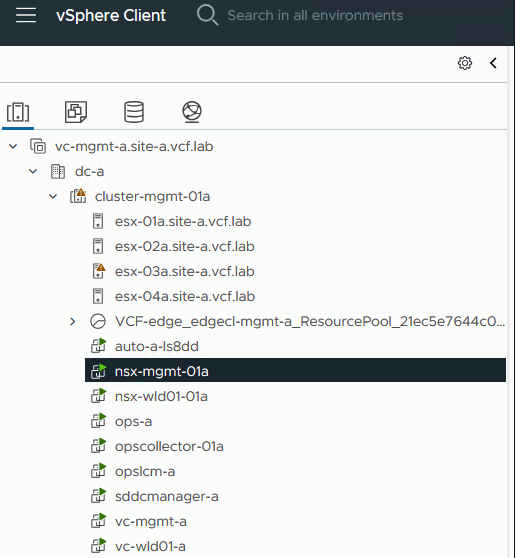
At the end of the deployment, we will have a nested VCF environment consisting of:
1× Management Domain (4 × ESXi Hosts):
- NSX Manager (Management Domain) with NSX Edges
- vCenter Server (Management Domain)
- VCF Operations Manager + Collector
- SDDC Manager
- Aria Automation
- Lifecycle Manager
- vCenter Server (Workload Domain)
- NSX Manager (Workload Domain)
1× Workload Domain (4 × ESXi Hosts):
- NSX Edges
- Supervisor (Tanzu)
Networking:
By default, networking is configured as shown in the subnets below for Site A. Day-2 operations also provide the option to deploy Site B, but we will skip that for this setup.
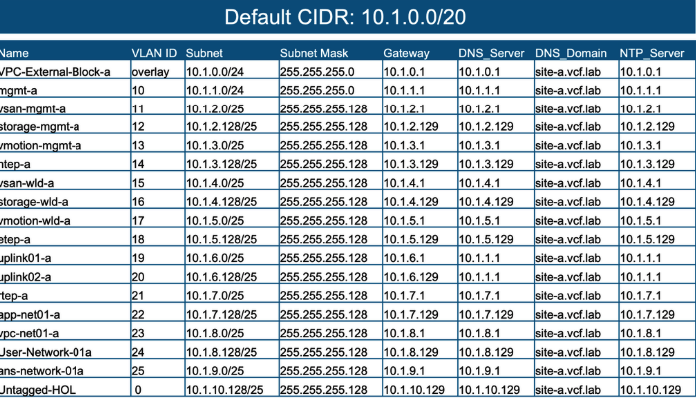
Source: https://vmware.github.io/Holodeck/images/Holodeck_Networking.png
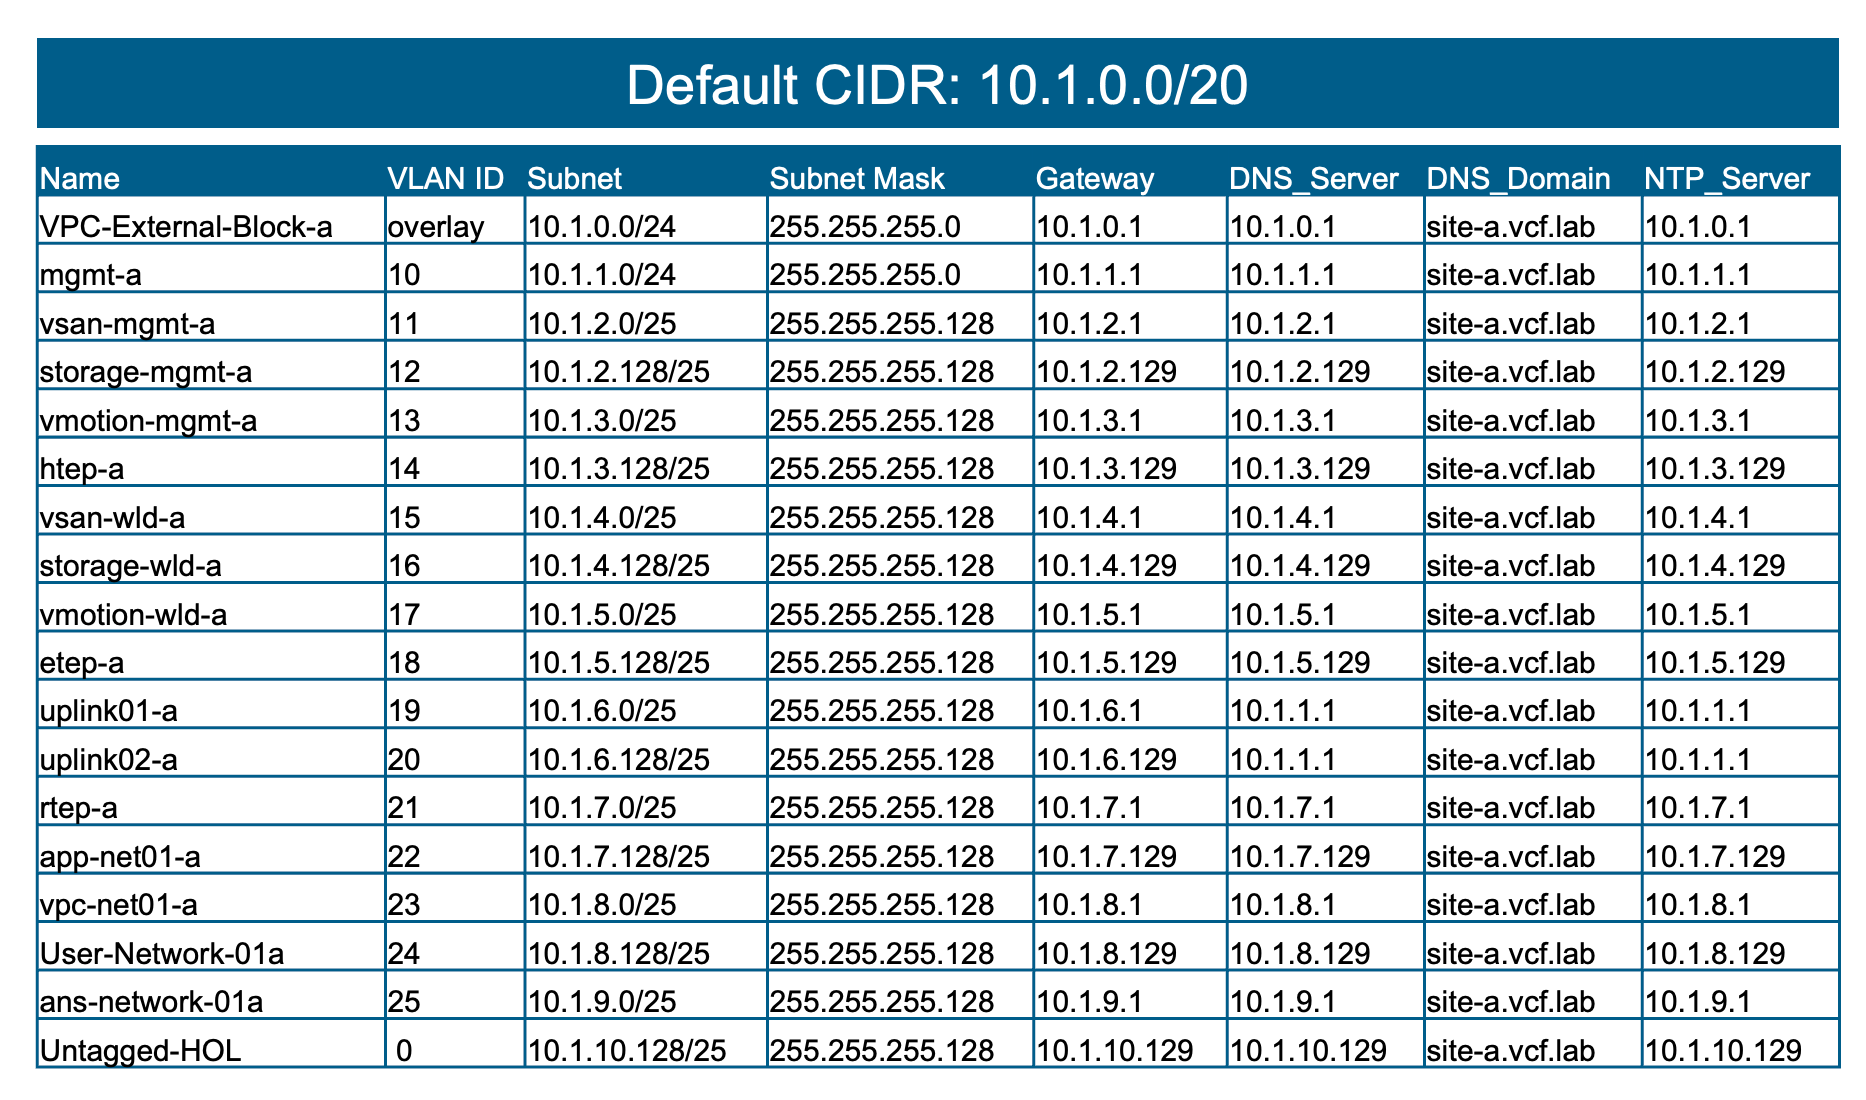
Prerequisites:
Networking:
If the environment is deployed on a cluster of ESXi hosts, the VLANs listed in the table above must be configured on the physical network. Alternatively, you can create an affinity rule to ensure all Holodeck VMs run on the same host. In that case, there is no need to modify the physical network configuration.
In my setup, I configured the VLANs on the physical network as well. The native VLAN MUST also be configured.
MGMT Port Group for Holorouter MGMT interface:
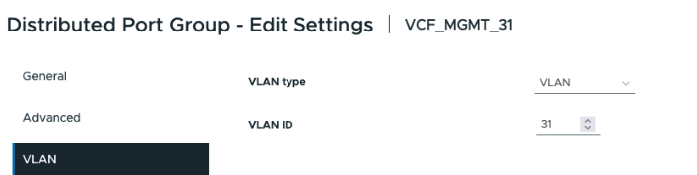
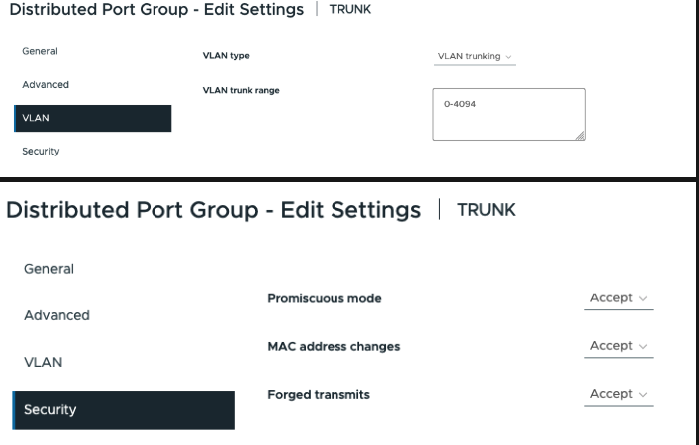
Create TRUNK Port Group:
- Create a TRUNK Port Group on a distributed switch with the allowed VLANs from the table above.
- Enable Promiscuous Mode, MAC Address Changes, and Forged Transmits under the Security settings of the port group.
- You can also allow all VLANs if preferred.
Physical Environment
Resources needed for deployment of nested Management domain:
| CPU | 24 |
| Memory | 325GB |
| Disk | 1.1TB |
Licensing:
For 90 days licensing in “License Later” mode.
Holorouter Deployment
Download .ova from Broadcom Download site:
Download link (version 9.0.1):
https://support.broadcom.com/group/ecx/productfiles?subFamily=Holodeck&displayGroup=Holodeck&release=9.0.1&os=&servicePk=&language=EN&freeDownloads=true
Additionally, we need to download two more files for later use:
- ESXi ISO Image (Version 9.0.1.0)
https://support.broadcom.com/group/ecx/productfiles?displayGroup=VMware%20Cloud%20Foundation%209&release=9.0.1.0&os=&servicePk=534266&language=EN&groupId=534208&viewGroup=true - Cloud Foundation Installer (SDDC Manager Appliance – v9.0.1.0)
https://support.broadcom.com/group/ecx/productfiles?displayGroup=VMware%20Cloud%20Foundation%209&release=9.0.1.0&os=&servicePk=534266&language=EN&groupId=534924&viewGroup=true
1. Deploy Holorouter .ova.
The Holorouter acts as the central point for deploying the entire nested VCF environment. Its primary functions are:
- Routing between the networks defined in the configuration table (see Table XY).
- Serving as a jump host for accessing VCF appliances.
Deployment is straightforward-simply follow the instructions provided with the .OVA file. Important:
✔ Don’t forget to enable the Webtop checkbox during deployment. This enables the Holorouter Web UI, which runs on port 30000.
After Deployment is finished, you should be able to access Holorouter via web browser on port 30000.
2. Transfer Binaries to Holorouter
Using SCP connection to Holorouter, transfer downloaded ESX and VCF Installer binaries to Holorouter (folder /holodeck-runtime/bin/9.0.1.0).
3. Deploying the environment
Once the Holorouter is deployed and configured, SSH into the Holorouter appliance and run the following commands:
- Enter PowerShell:
pwshStart the VCF Deployment:
New-HoloDeckInstance -Version "9.0.1.0" -DeployVcfAutomation -NsxEdgeClusterMgmtDomain -NsxEdgeClusterWkldDomain -DeploySupervisorThis command will deploy the entire VCF environment, including:
- Aria Automation
- Supervisor (Tanzu)
- NSX Edge Clusters for both Management and Workload domains
Note: The full deployment process takes approximately 12 hours.
Post-Deployment Access
After the deployment completes, you should be able to access all appliances. To easily retrieve IP addresses and FQDNs, use the following commands:
Get-HoloDeckSubnet -Site a | ft -AutoSizeGet-HoloDeckDNSConfigHolodeck provides several additional PowerShell commands that can help with managing and troubleshooting your nested VCF environment. For a complete list and detailed documentation, visit the official Holodeck website.